これを行う最善の方法は、範囲内にある ROI のセクションを取得し、ROI の各側 (上/下/左/右) が範囲外である量を計算し、<を使用することであることがわかりました。コード>07 各辺の周りにそれだけ多くの黒い境界線を埋め込む関数。とてもうまくいきました。現在は次のようになっています:
Mat getPaddedROI(const Mat &input, int top_left_x, int top_left_y, int width, int height, Scalar paddingColor) {
    int bottom_right_x = top_left_x + width;
    int bottom_right_y = top_left_y + height;

    Mat output;
    if (top_left_x < 0 || top_left_y < 0 || bottom_right_x > input.cols || bottom_right_y > input.rows) {
        // border padding will be required
        int border_left = 0, border_right = 0, border_top = 0, border_bottom = 0;

        if (top_left_x < 0) {
            width = width + top_left_x;
            border_left = -1 * top_left_x;
            top_left_x = 0;
        }
        if (top_left_y < 0) {
            height = height + top_left_y;
            border_top = -1 * top_left_y;
            top_left_y = 0;
        }
        if (bottom_right_x > input.cols) {
            width = width - (bottom_right_x - input.cols);
            border_right = bottom_right_x - input.cols;
        }
        if (bottom_right_y > input.rows) {
            height = height - (bottom_right_y - input.rows);
            border_bottom = bottom_right_y - input.rows;
        }

        Rect R(top_left_x, top_left_y, width, height);
        copyMakeBorder(input(R), output, border_top, border_bottom, border_left, border_right, BORDER_CONSTANT, paddingColor);
    }
    else {
        // no border padding required
        Rect R(top_left_x, top_left_y, width, height);
        output = input(R);
    }
    return output;
}
そして、好きな色のパディングを簡単に作ることができます.
他のすべての答えは、私には少し複雑すぎるようです。簡単に:
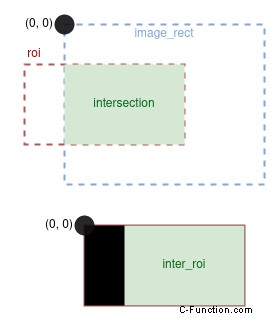
// Create rect representing the image
auto image_rect = cv::Rect({}, image.size());

// Find intersection, i.e. valid crop region
auto intersection = image_rect & roi;

// Move intersection to the result coordinate space
auto inter_roi = intersection - roi.tl();

// Create black image and copy intersection
cv::Mat crop = cv::Mat::zeros(roi.size(), image.type());
image(intersection).copyTo(crop(inter_roi));
参考画像: